OpenCVForUnity+DlibFaceLandmarkDetector实现简单live2d面部捕捉
实现环境
- Unity2021.3.20f1c1
- OpenCVForUnity2.5.8
- Dlib FaceLandmark Detector 1.3.3
- CubismSdkForUnity-5-r.2
实验过程
打开摄像头
使用Unity中的WebCam实现。开个携程,异步等待用户允许摄像机使用,先获取设备,然后获取WebCamTexture格式的图像,转成Texture2d后即可使用OpenCVForUnity中的texture2DToMat工具获取到该图像的Mat,以便接下来用OpenCV对图像进行操作。
        //等待用户允许访问
        yield return Application.RequestUserAuthorization(UserAuthorization.WebCam);
        //如果用户允许访问,开始获取图像
        if (Application.HasUserAuthorization(UserAuthorization.WebCam))
        {
            //先获取设备
            WebCamDevice[] devices = WebCamTexture.devices;
            string deviceName = devices[0].name;

            //然后获取图像
            tex = new WebCamTexture(deviceName);
            tex.Play();

            Mat camMat = new Mat(new Size(tex.width, tex.height), CvType.CV_8UC3);
            Mat gray = new Mat();

            MatOfRect faceRect = new MatOfRect();
            openCam = true;
            while (tex.isPlaying)
            {
                Texture2D t2d = new Texture2D(tex.width, tex.height, TextureFormat.ARGB32, true);
                //将WebCamTexture 的像素保存到texture2D中
                t2d.SetPixels(tex.GetPixels());
                t2d.Apply();
                if(camMat.type() == CvType.CV_8UC1)
                    Imgproc.cvtColor(camMat, camMat, Imgproc.COLOR_GRAY2BGR);
                Utils.texture2DToMat(t2d, camMat);
识别人脸并获取Landmark
这边使用OpenCV自带的CascadeClassifie库好像也可以实现?我用的是Dlib FaceLandmark Detector中的FaceLandmarkDetector
先检测出人脸的位置,获取到Rect后对其进行人脸的68点定位。我使用的是Dlib FaceLandmark Detector官方StreamingAssets中的sp_human_face_68.dat文件。
detector.SetImage((IntPtr)camMat.dataAddr(), camMat.width(), camMat.height(), (int)camMat.elemSize());
                List<UnityEngine.Rect> rects = detector.Detect();
                for (int i = 0; i < rects.Count; i++)
                {
                    Imgproc.rectangle(camMat, new Point(rects[i].x, rects[i].y), new Point(rects[i].x + rects[i].width, rects[i].y + rects[i].height), new Scalar(0, 255, 0, 255), 2);  //在原本的画面中画框,框出人脸额位置,其中rects[i].x和rects[i].y为框的左上角的顶点,rects[i].width、rects[i].height即为框的宽和高

                }
                // create a face detector
                if (rects.Count > 0)
                {
                    detector.SetImage((IntPtr)camMat.dataAddr(), camMat.width(), camMat.height(), (int)camMat.elemSize());
                    List<Vector2> points = detector.DetectLandmark(rects[0]);
                    // Debug.Log(points.Count);
                    DrawLandmark(camMat, points, new Scalar(0, 255, 0, 255), 2);
估计人脸姿态

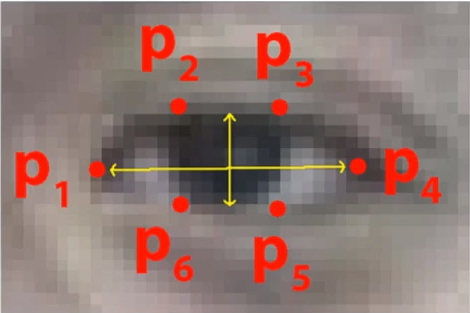
首先定义6关键点的3D Model。
        //set 3d face object points.
        objectPoints68 = new MatOfPoint3f(
               new Point3(-34, 90, 83), //l eye (Interpupillary breadth)
               new Point3(34, 90, 83), //r eye (Interpupillary breadth)
               new Point3(0.0, 50, 117), //nose (Tip)
               new Point3(0.0, 32, 97), //nose (Subnasale)
               new Point3(-79, 90, 10), //l ear (Bitragion breadth)
               new Point3(79, 90, 10) //r ear (Bitragion breadth)
        );
然后基于刚刚产生的landmark检测出六关键点,并传入OpenCV的solvePnP中进行姿态估计。用AR工具将得到的数据转换为poseData。由于Unity是左手坐标系,OpenCV是右手系,还需要进行矩阵的转换。最后经过一个我不是很懂的PV坐标转换得到最终的旋转四元数。
 imagePoints.fromArray(
                               new Point((points[38].x + points[41].x) / 2, (points[38].y + points[41].y) / 2), //l eye (Interpupillary breadth)
                               new Point((points[43].x + points[46].x) / 2, (points[43].y + points[46].y) / 2), //r eye (Interpupillary breadth)
                               new Point(points[30].x, points[30].y), //nose (Tip)
                               new Point(points[33].x, points[33].y), //nose (Subnasale)
                               new Point(points[0].x, points[0].y), //l ear (Bitragion breadth)
                               new Point(points[16].x, points[16].y) //r ear (Bitragion breadth)
                        );


                        SetCameraMatrix(camMatrix, camMat.width(), camMat.height());

                        Calib3d.solvePnP(objectPoints68, imagePoints, camMatrix, distCoeffs, rvec, tvec);
 // Convert to unity pose data.
                        double[] rvecArr = new double[3];
                        rvec.get(0, 0, rvecArr);
                        double[] tvecArr = new double[3];
                        tvec.get(0, 0, tvecArr);
                        PoseData poseData = ARUtils.ConvertRvecTvecToPoseData(rvecArr, tvecArr);

                        // adjust the position to the scale of real-world space.
                        poseData.pos = new Vector3(poseData.pos.x * 0.001f, poseData.pos.y * 0.001f, poseData.pos.z * 0.001f);

                        Matrix4x4 transformationM = Matrix4x4.TRS(poseData.pos, poseData.rot, Vector3.one);

                        // right-handed coordinates system (OpenCV) to left-handed one (Unity)
                        // https://stackoverflow.com/questions/30234945/change-handedness-of-a-row-major-4x4-transformation-matrix
                        transformationM = invertYM * transformationM * invertYM;

                        // Apply Y-axis and Z-axis refletion matrix. (Adjust the posture of the AR object)
                        transformationM = transformationM * invertYM * invertZM;

                        Vector3 headPosition = ARUtils.ExtractTranslationFromMatrix(ref transformationM);
                        Quaternion headRotation = ARUtils.ExtractRotationFromMatrix(ref transformationM);
我将这个四元数的旋转赋值到一个父物体上,通过子物体坐标的偏移实现live2d所需的lookatTarget。通过子物体坐标参数的调整达到最终还算可以的效果。这是我子物体的位置参数。这个可能要按实际情况自己慢慢调。


眼睛开闭检测
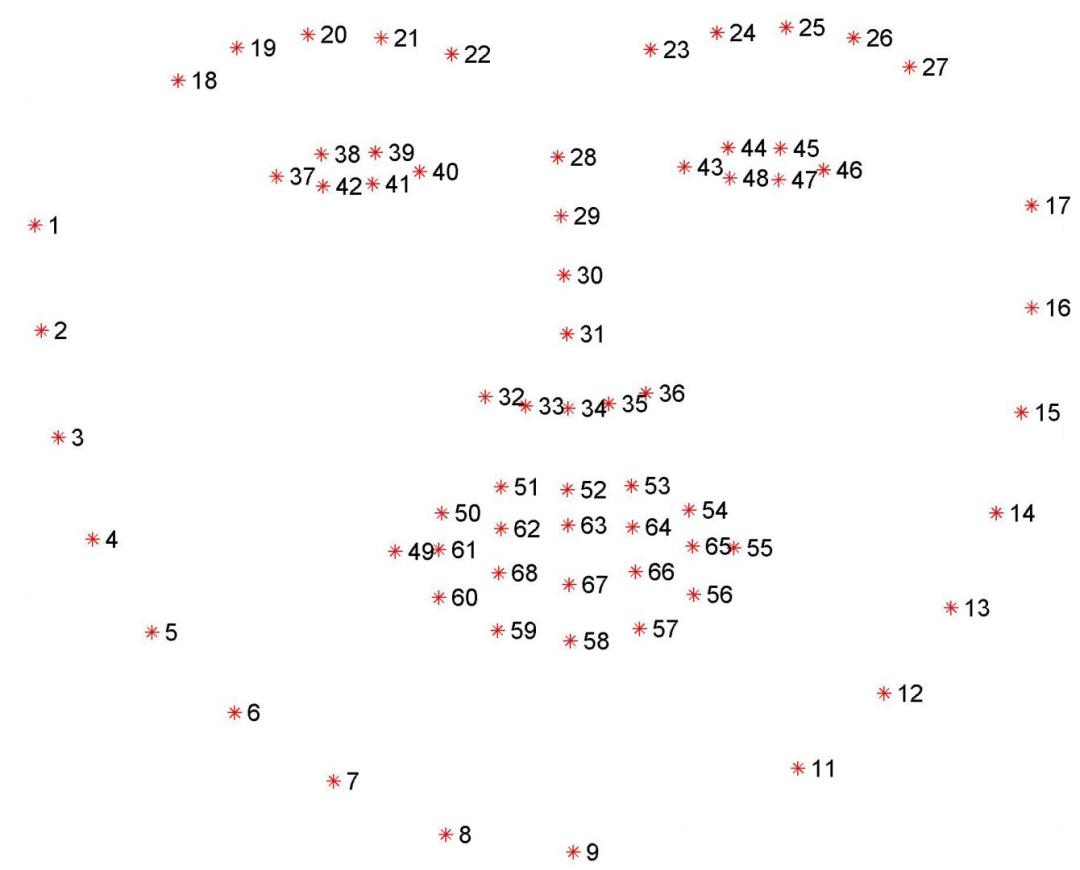
我们可以通过人眼纵横比判断眨眼。由纵横比公式与68点人脸特征图可知,对于左眼,我们可以通过38和42的距离加上39和41的距离减去37和40的距离乘2计算出纵横比。经实验这些数据基本处于0-0.25之间,且与睁眼的幅度成正相关,故归一化后传给live2d实现眨眼。

                      #region eyeOpen
                        float A = (points[36 + 1] - points[36 + 5]).magnitude;
                        float B = (points[36 + 2] - points[36 + 4]).magnitude;
                        float C = (points[36 + 0] - points[36 + 3]).magnitude;
                        float ratel = (A + B) / (C * 2) / 0.25f;

                        A = (points[42 + 1] - points[42 + 5]).magnitude;
                        B = (points[42 + 2] - points[42 + 4]).magnitude;
                        C = (points[42 + 0] - points[42 + 3]).magnitude;
                        float rater = (A + B) / (C * 2) / 0.25f;

                        eyeOpen[0].BlendToValue(CubismParameterBlendMode.Override, ratel);
                        eyeOpen[1].BlendToValue(CubismParameterBlendMode.Override, rater);
                        #endregion

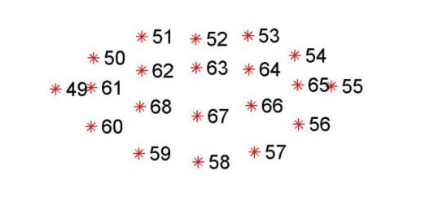
张嘴检测
其实这部分的效果不是很好。和眼睛一样,我采用了计算纵横比的方法判断嘴的开合,经实验当人物处于正面对摄像头时较为准确,而当人物侧对摄像头时有时会自动张嘴。可能是侧对摄像头时横向看到的嘴小了,纵横比不能很好的胜任。
                        #region mouse
                        C = (points[48 + 1] - points[55]).magnitude;
                        A = (points[51] - points[59]).magnitude;
                        B = (points[53] - points[57]).magnitude;
                        float mouth = (A + B) / (C * 2);

                        //Debug.Log(mouth);
                        mouth = (mouth - 0.7f) / 0.2f;
                        mouthOpen.MouthOpening = mouth;

                        #endregion

实验总结
关于这几个插件网上都没有详细的资料,我只能自己一步步摸索,看看官方案例的源码。模型也是官方的场景里拖过来用的。其中CVVtuberExample也帮了我很大的忙。最后能自己实现个面部捕捉系统还是很有成就感的。